gRPC 代码使用的 C/C++ 技巧
潘忠显 / 2021-09-02
本文介绍 gRPC 中使用 C 和 C++ 的一些技巧,当中有不少 Modern C++ 的特性。通过阅读 gRPC 源码,看到特性具体场景的使用,能够帮助我们加深对新特性的理解,也将会对我们的工作带来益处。另有《gRPC基础概念详解》欢迎查阅。
本文先占个位,会持续更新。难免有谬误指出,也请读者不吝赐教。
1. 使用 override 标记析构函数
参考源码文件:include/grpcpp/channel.h
在 C++ 继承类的时候(假设基类为 Base 和派生类为 Derived),构造函数和析构函数调用时这样的:
- new Derived 对象的时候,会先后调用 Base 和 Derived 的构造函数
- delete Derived 对象的时候,会先后调用
~Derived()和~Base(),与构造过程顺序相反
析构函数需要声明为虚函数的原因是:如果析构函数不是虚函数,当使用 Base* ptr 存储 Derived 的对象地址,在 delete ptr 的时候,就不会调用到 ~Derived(),而是直接调用了 ~Base() 就结束了,这样会造成在 ~Derived 中需要释放的一些资源没有被释放。
为了避免上边的这种情况,类的析构函数通常会标记为虚函数。而 override 说明符的作用是“指定一个虚函数覆盖另一个虚函数”。如果在子类中声明其析构函数为 virtual + override,能够保证其父类中的析构也是虚函数,不然会在编译时报错,以此来保证代码是 well-formed(结构良好的,反义词 ill-formed)
~Channel() override;
C++ 标准文档中也有类似的解释说明:
10.3 Virtual functions [class.virtual]
5. If a destructor is marked
overridebut the base class does not have avirtualdestructor, the program is ill-formed.[ Example:
struct B {
    virtual void f(int);
};

struct D : B
{
    void f(long) override; // error: wrong signature overriding B::f
    void f(int) override; // OK
};
—end example ]
2. 禁止外部创建类对象
参考源码文件:include/grpcpp/channel.h
通过 私有化类的构造函数 + 声明友元 的方式,能够禁止外部创建该类的对象,而只能通过某些固定的函数创建。
比如创建 grpc::Channel 只能通过 CreateChannel() 最终会使用 grpc::CreateChannelInternal() 函数来 new 一个 Channel 的对象,而该函数作为 Channel 的友元,是可以访问其私有成员函数,这其中也包括构造函数。
class Channel{
 private:
  friend std::shared_ptr<Channel> grpc::CreateChannelInternal(...);
  Channel(...);
};
3. C 中 使用 typedef 简化结构体声明
参考源码文件:include/grpc/impl/codegen/grpc_types.h
C++ 和 C 存在着不少差异,其中一点是:当声明一个变量是某个结构体时,在 C++ 中可以直接使用结构体名字进行定义,而 C 中则必须带有关键字 struct。也就是说,下边的代码使用 g++ 指令可以编译,而使用 gcc 指令则不行。
struct A {
  int i;
};

int main() { A a; }
因为 gRPC Core 的头文件是 C 和 C++ 公用的,因此为了简化代码,gRPC 中大量的使用了 typedef struct A A 的方式去声明,尤其大部分结构被定义在 文件 中,比如:
/** The Channel interface allows creation of Call objects. */
typedef struct grpc_channel grpc_channel;
typedef 的说明中有提到:typedef 声明提供一种声明标识符为类型别名的方式,以用于替换可能复杂的类型名。
4. C++ 中的链式调用
参考源码文件:src/core/lib/backoff/backoff.h
链式调用(Method Chaining)在 JavaScript 中比较常见,用起来会显得比较简洁。
使用 jQuery 的时候,会经常见到这样的表达:
$("p").animate({width: "100%"}).animate({fontSize: "46px"}).animate({borderWidth: 30});
而在 core/ext/filter/client_channel/subchannel.cc 中,也有一段链式调用:
  return BackOff::Options()
      .set_initial_backoff(initial_backoff_ms)
      .set_multiplier(fixed_reconnect_backoff
                          ? 1.0
                          : GRPC_SUBCHANNEL_RECONNECT_BACKOFF_MULTIPLIER)
      .set_jitter(fixed_reconnect_backoff ? 0.0
                                          : GRPC_SUBCHANNEL_RECONNECT_JITTER)
      .set_max_backoff(max_backoff_ms);
其实现就是在这些设置函数中,都返回对象本身的引用即可:
  class Options {
   public:
    Options& set_initial_backoff(grpc_millis initial_backoff) {
      initial_backoff_ = initial_backoff;
      return *this;
    }
  ...
  }
5. C 中 “私有化” struct 的成员变量
参考源码文件:core/lib/surface/call.h
在C++中,禁止外部访问一个类或者结构体的成员,只需要将其设置为的 private 即可,但在 C 中只有 struct,只要外部调用知道其结构,就能够通过指针或对象,对其成员对象进行修改。
如果想刻意的隐藏结构体的详细成员,可以像处理 grpc_call 一样,通过以下的方式进行(当然对 C++ 也适用):
- 在 头文件1 中声明结构体
- 在 源文件 中定义结构体,以及该结构相关的接口函数
- 在 头文件2 中
#include头文件1,声明该结构体相关的接口函数,以供外部调用。
头文件1 和头文件2 也可以是同一个文件,不过 grpc 源码中为了组织方便,将结构的声明都放在了 grpc_types.h 文件之中。
具体地以 grpc_call 为例,在 grpc/impl/codegen/grpc_types.h 中声明:
typedef struct grpc_call grpc_call;
在 core/lib/surface/call.cc 中定义:
struct grpc_call {
  ...
};
在 core/lib/surface/call.h 中,#include<grpc/grpc.h> 并使用 grpc_call,主要定义了一些操作 grpc_call 的接口:
grpc_error_handle grpc_call_create(const grpc_call_create_args* args,
                                   grpc_call** call);
grpc_core::Arena* grpc_call_get_arena(grpc_call* call);
void grpc_call_context_set(grpc_call* call, grpc_context_index elem,
                           void* value, void (*destroy)(void* value));
以上三个接口分别是创建 grpc_call、获取 grpc_call 的属性、设置 grpc_call 的属性。
6. 使用成员函数构造 std::thread
参考源码文件:examples/cpp/helloworld/greeter_async_client2.cc
在 greeter_async_client2.cc 文件中,展示了使用两个线程分别处理发送请求和接受返回,其中异步发送RPC的线程使用如下方式创建:
// Spawn reader thread that loops indefinitely
std::thread thread_ = std::thread(&GreeterClient::AsyncCompleteRpc, &greeter);
thread 的构造函数有以下几种方式,显然上边的这种属于下边的第 5 种,即通过调用对象对应类的某个成员函数来创建线程:
std::thread t1;                  // t1 is not a thread
std::thread t2(f1, n + 1);       // pass by value
std::thread t3(f2, std::ref(n)); // pass by reference
std::thread t4(std::move(t3));   // t4 is now running f2(). t3 is no longer a thread
std::thread t5(&foo::bar, &f);   // t5 runs foo::bar() on object f
std::thread t6(b);               // t6 runs baz::operator() on a copy of object b
为什么上边使用的 std::thread t5(&foo::bar, &f); 而不是以下几种:
- case 1:
std::thread t5(&foo::bar); - case 2:
std::thread t5(f.bar); - case 3:
std::thread t5(&f.bar, &f); - case 4:
std::thread t5(&(foo::bar), &f); - case 5:
std::thread t5((&foo)::bar, &f);
非静态成员函数需要传入指针
我们通过 GDB 来打印一下 foo::bar 会看到:
(gdb) p foo::bar
$1 = {void (foo * const)} 0x400a5a <foo::bar()>
- 说明
foo::bar是一个接受foo* const的函数,只不过我们在调用f.bar()的时候编译器会隐式地将&f作为第一个参数传入,因此 case 1 和 case 2 都是缺少参数的 const修饰的是foo*表示这个指针变量不会改变,但是这个指针指向的内容是可以变的。- GDB 中的符号和编译器解释是不同的:这里可以直接打印
foo::bar,但写代码是无法只使用foo::bar来获得函数地址的

已绑定成员函数禁止转换成成员函数指针
case 3 在编译过程中,会有如下报错:
error: ISO C++ forbids taking the address of a bound member function to form a pointer to member function.
指向成员函数的指针格式固定
A pointer to non-static member function
fwhich is a member of classCcan be initialized with the expression&C::fexactly.
只能有一种方式来表示指向非静态成员函数,那就是 &C::f,case 4 和 case 5 种的表达式 &(foo::bar)、(&foo)::bar
有从绑定成员函数指针到成员函数指针的转换方法,可以参考 Extracting the Function Pointer from a Bound Pointer to Member Function.
7. 使用 std::condition_variable 同步
参考源码文件:examples/cpp/helloworld/greeter_callback_client.cc
std::condition_variable 是一个类,作为同步原语能够用于阻塞一个或多个线程,直到 cv 被另外的线程做了修改并通知,需要结合 std::mutex 使用。在 greeter_callback_client.cc 中除了创建对象之外,还有两处涉及到 condition_variable:
- 在 API 的回调函数中进行通知
cv.notify_one() - 在调用 API 的函数中等待条件满足
cv.wait(lock)
// The actual RPC.
std::mutex mu;
std::condition_variable cv;  // <= 0
bool done = false;
Status status;
stub_->async()->SayHello(&context, &request, &reply,
                         [&mu, &cv, &done, &status](Status s) {
                           status = std::move(s);
                           std::lock_guard<std::mutex> lock(mu);
                           done = true;
                           cv.notify_one();  // <= 1
                         });

std::unique_lock<std::mutex> lock(mu);
while (!done) {
  cv.wait(lock); // <= 2
}
这里有用到互斥量、锁、条件变量,这些是用在多线程之间进行同步控制的,在同一个线程中没有必要使用锁。
换句话说,调用回调函数和处理回调返回内容是在两个线程中进行的,所以才需要互斥量、锁、条件变量。分别在 cv.notify_one() 和 cv.wait(lock) 之后,增加线程 ID 的打印 std::this_thread::get_id(),会发现两个线程ID是不同的,印证这点。
caller API thread_id: 140364787193984
callee API thread_id: 140364433942272
条件变量函数细节
cv.wait(lock) 会原子地解锁 lock ,阻塞当前执行线程,并将它添加到于 *this 上等待的线程列表。线程将在执行 notify_all() 或 notify_one() 时被解除阻塞。解阻塞时,无关乎原因, lock 再次锁定且 wait 退出。
几种同步情况的解释:
- unique_lock 创建之后,到
cv.wait()之前,如果进入回调函数,会卡在lock_guard创建之后 cv.wait(lock)会释放锁,阻塞调用者执行线程,并将当前线程,加到等待线程列表中cv.wait(lock)阻塞住之后,锁被释放了,回调函数可以执行lock_guard守护的内容,直到cv.notify_one()cv.notify_one()会唤醒正在等待的线程,cv.wait(lock)被解除阻塞、锁住 lock、从wait(lock)返回,可以退出循环cv.notify_one()也可能会被虚假唤醒,但因为done变量的存在而保证了逻辑正常:- 如果回调还没有走到
lock_guard守护的部分,则cv.wait(lock)会正常执行,但因为 while 条件不满足,会仍然进行cv.wait(lock) - 如果回调中正在执行
lock_guard守护的部分,则cv.wait(lock)仍然会被卡住,因为他无法对lock进行加锁,直到回调执行完,done已经被设置为true,可以退出循环
- 如果回调还没有走到
其他几点细节:
cv.wait(lock);执行的时候,lock 是锁住的- 最后的
while-loop的表示方式,也可以使用一条语句表示:cv.wait(lock, [&done](){return done;});
虚假唤醒
上边提到,这里的 done 变量,是用来避免 cv.wait() 被虚假唤醒(Spurious wakeup):虚假唤醒是指当一个线程等待条件变量被触发,但却发现条件未被满足,“虚假(spurious)”是指没满足条件却被的唤醒。
虚假唤醒也不是无缘无故发生的,通常是在发出条件变量信号和等待线程最终运行之间,存在另外一个线程运行,并且该线程改变了条件变量。线程之间存在竞争条件,典型地,“sometimes, the thread waking up on the condition variable runs first, winning the race, and sometimes it runs second, losing the race.”
虚假唤醒对这个 gRPC 中这个例子的影响,如果没有这个 done 的条件来避免虚假唤醒会发生什么?回调函数还没有执行完毕,cv.wait() 就得到了满足。
unique_lock
unique_lock 类模板是通用的可移动,但不可复制的互斥包装器,允许延迟锁定、锁定的有时限尝试、递归锁定、所有权转移和与条件变量一同使用。
unique_lock 类模板创建的类在构建时,使用不同的方式构建,可以指定创建的锁的状态,是锁定互斥量还是不锁住,以及其他状态。8 种构造函数定义详见 std::unique_lock<Mutex>::unique_lock,这里进列举常用的三种:
| 构造函数 | 编号 | 功能说明 |
|---|---|---|
explicit unique_lock(mutex_type &m); |
(3) | 通过调用 m.lock() 锁定关联互斥 |
unique_lock(mutex_type &m, std::defer_lock_t t) noexcept; |
(4) | 不锁定关联互斥 |
unique_lock(mutex_type &m, std::try_to_lock_t t); |
(5) | 通过调用 m.try_lock() 尝试锁定关联互斥而不阻塞 |
回调 Client 示例中使用的是 explicit unique_lock(mutex_type &m); 的形势,因此创建之后,就已经锁定了互斥量。
8. cout 输出自定义的类型
参考源码文件:test/cc/end2end/async_end2end_test.cc
自己定义了一个类,如果想通过类似于 cout 的方式进行打印,或将其导出到其他的流对象中,有两种实现方式:
- 在成员函数中声明友元函数
friend std::ostream& operator<<(std::ostream& os, const Bar& bar)可以将公私成员进行打印 - 在成员函数外声明普通函数
std::ostream& operator<<(std::ostream& os, const Bar& bar),可以调用其公有成员进行打印
grpc 中也有这种使用场景:
class TestScenario;
std::ostream& operator<<(std::ostream& out, const TestScenario& scenario) {
  return out << "TestScenario{protocol="
             << (scenario.protocol == Protocol::INPROC ? "INPROC" : "TCP")
             << "," << scenario.credentials_type << "}";
}
9. shared_from_this 从类内部创建 shared_ptr
参考源码文件:include/grpcpp/channel.h
在定义 class Channel 的时,有使用 std::enable_shared_from_this 这一类模板:
/// Channels represent a connection to an endpoint. Created by \a CreateChannel.
class Channel final : public grpc::ChannelInterface,
                      public grpc::internal::CallHook,
                      public std::enable_shared_from_this<Channel>,
                      private grpc::GrpcLibraryCodegen {
class Channel 继承了 std::enable_shared_from_this<Channel> 之后,就可以使用(/拥有)成员函数 shared_from_this()。
share_ptr 的基本用法
关于 shared_ptr 我们有一些 基本认识。很容易能理解,在下边的程序中,构造函数 Foo::Foo() 会被调用1次,而析构函数 Foo::~Foo() 则会被调用两次,因为两个 shared_ptr 对象分别对同一个指针进行计数:
#include <memory>
struct Foo {};
int main() {
  auto f = new Foo;
  std::shared_ptr<Foo> pf1(f);
  std::shared_ptr<Foo> pf2(f);
  return 0;
}
因此,我们通常会用 make_shared<T> + 复制赋值来传递 shared_ptr。
什么情况下会用到 shared_from_this()
这个函数字面意思就是从 this 指针创建 shared_ptr,因此使用的场景就是在类成员函数之内,要创建指向自己的 shared_ptr(因为在类的外部也不会存在 this 指针)。
cppreference 上举了个例子,我把它简化如下:
#include <memory>

struct Foo : public std::enable_shared_from_this<Foo> {
  std::shared_ptr<Foo> get_shared_ptr() { return shared_from_this(); }
};

int main() {
  Foo* f = new Foo;
  std::shared_ptr<Foo> pf1(f);
  std::shared_ptr<Foo> pf2 = f->get_shared_ptr();
}
需要注意一点,std::shared_ptr<Foo> pf1(f); 是必须的,不然会抛出异常:
terminate called after throwing an instance of ‘std::bad_weak_ptr’
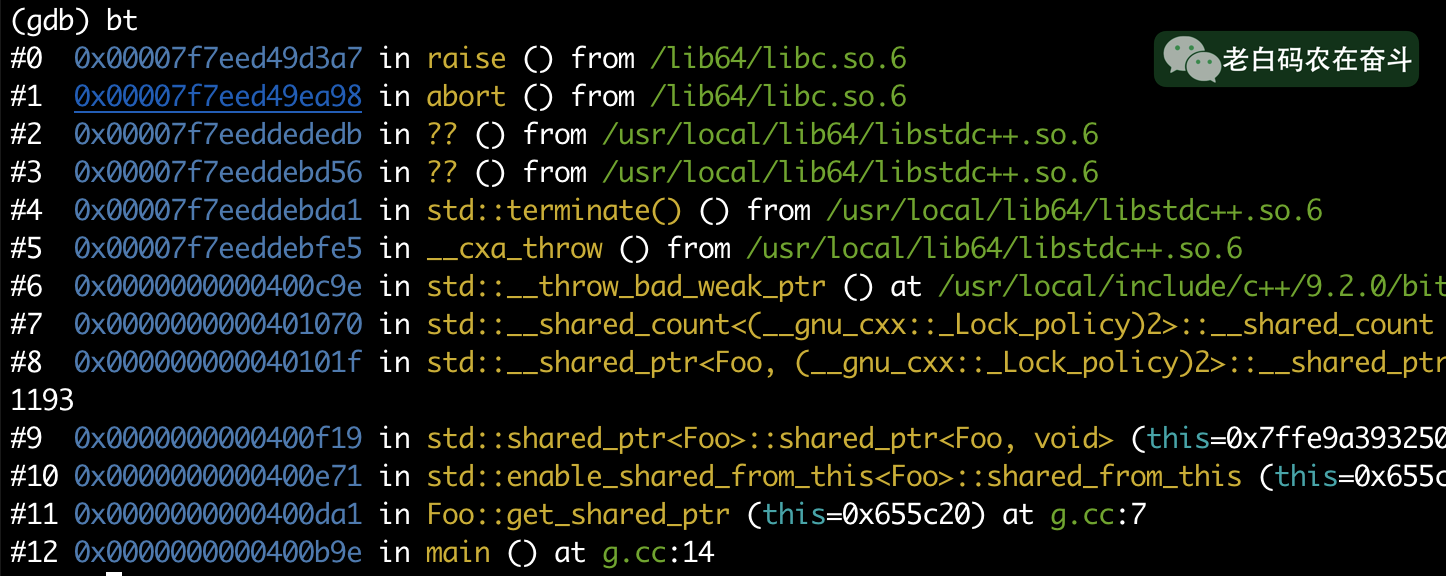
gRPC 如何使用shared_from_this()
上边举出的 cppreference 中的例子有点脱离现实(现实中没人会这么用,因为直接 auto pf2 = pf1; 就可以了)。接下来,看看 gRPC 中是如何使用的。
Trick: 为了快速找到 Channel::shared_from_this() 到使用位置,可以直接将继承 enanble_shared_from_this() 的语句注释掉再编译,使用到的地方就会报错。
文件 src/cpp/client/channel_cc.cc 中有如下使用方法,是在 Channel 的成员函数中创建了一个 shared_ptr<Channel>,然后调用了一个接收共享指针的函数 set_call:
grpc::internal::Call Channel::CreateCallInternal(...) {
  ...
  context->set_call(c_call, shared_from_this());
  ...
}
10. 空宏的作用
头文件保护符
也称为 #include guard,macro guard, header guard or file guard,能保证即使文件被多次包含(#include),头文件也只被引入一次。
#ifndef GRPC_GRPC_H
#define GRPC_GRPC_H

...

#endif /* GRPC_GRPC_H */
如果没有该保护符,多处 include 该文件时,文件中内容会被多次引入,会造成:
- 声明语句重复,影响编译效率
- 定义语句重复,产生编译错误
作为开关
常用于 Debug 模式的开关,当某个宏定义存在的时候,进入 Debug 模式,通常会打印一些日志,多做一些断言:
#ifndef NDEBUG
#define GPR_DEBUG_ASSERT(x) GPR_ASSERT(x)
#else
#define GPR_DEBUG_ASSERT(x)
#endif
编译器兼容性
在 GNU C 中,可以声明函数的一些属性,用于优化函数调用,或者用于更细致地检查代码。而在其他 C 编译器中,可能就不支持这样的属性。
不同的编译器,会定义不同的宏,以便让用户感知到正在使用何种编译器。比如,当遇到有定义 __GNUC__ 时,意味着正在利用 GCC (GNU Compiler Collection) 编译,这时就可以使用 GNU 的一些扩展(__attribute__ 后续还会介绍):
#ifndef GPR_PRINT_FORMAT_CHECK
#ifdef __GNUC__
#define GPR_PRINT_FORMAT_CHECK(FORMAT_STR, ARGS) \
  __attribute__((format(printf, FORMAT_STR, ARGS)))
#else
#define GPR_PRINT_FORMAT_CHECK(FORMAT_STR, ARGS)
#endif
#endif /* GPR_PRINT_FORMAT_CHECK */
平台兼容性
在 Linux 等平台上构建动态库,不要在函数声明上做额外的修饰,而在 Windows 上使用 DLL,通常需要指定:
__declspec(dllexport)– 在编译库时__declspec(dllimport)– 在使用库时
gRPC 作为一个可以跨平台使用的库,在平台兼容性上也利用到了一些空的宏定义来辅助实现。这里边用到了在 Windows 平台特有的宏定义 _WIN64 或 WIN64:
#if defined(_WIN64) || defined(WIN64) || defined(_WIN32) || defined(WIN32)
#define GPR_WINDOWS 1
#endif

#ifdef GPR_WINDOWS
#define GPR_EXPORT __declspec(dllexport)
#endif

#ifndef GPR_EXPORT
#define GPR_EXPORT
#endif

GPR_EXPORT void GPR_CALLTYPE grpcsharp_metadata_credentials_notify_from_plugin(...)
提高可读性
这里有一个空的宏定义 GRPCAPI,没有找到任何因为不同情况而做特殊的定义:
GRPCAPI grpc_channel* grpc_cronet_secure_channel_create(
    void* engine, const char* target, const grpc_channel_args* args,
    void* reserved);
这里 GRPCAPI 的作用基本上就是为了可读性,让使用着知道,这些函数是 gRPC 提供的 API。
这种用途的一种延伸使用,在工具 list_api.py 中,这个脚本中会匹配这些开头的关键字,然后罗列出所有的 API:
_RE_API = r'(?:GPRAPI|GRPCAPI|CENSUSAPI)([^;]*);'

for m in re.finditer(_RE_API, text):   # match file content
...
当运行该脚本之后,会得到如下的结果(只列举其中一条):
- arguments: void* engine, const char* target, const grpc_channel_args* args, void*
    reserved
  header: include/grpc/grpc_cronet.h
  name: grpc_cronet_secure_channel_create
  return_type: grpc_channel*
11. 在指定地址上创建对象
函数定义:
void gpr_mu_init(gpr_mu* mu) {
  static_assert(sizeof(gpr_mu) == sizeof(absl::Mutex),
                "gpr_mu and Mutex must be the same size");
  new (mu) absl::Mutex;
}
对 gpr_mu_init 的调用:
typedef long int intptr_t;
typedef intptr_t gpr_mu;
static gpr_mu g_poller_mu;
gpr_mu_init(&g_poller_mu);
在 cppreference 上,new 的使用方法有 4 种,下边 2 种方式称为 placement new,即在已经分配好的内存地址上,构造一个指定的对象:
::(optional) new (placement-params) ( type ) initializer(optional)	(3)
::(optional) new (placement-params) new-type initializer(optional)	(4)
什么场景会用到这种 new?分配了一块地址而没有构建对象,比如这里 static gpr_mu g_poller_mu; 实际上并没有构造 absl::Mutex,只是一个 long int。
不要被例子中误导,认为普通的静态变量页需要做这样的操作,反例:
#include <iostream>
using namespace std;
class C {
 public:
  C() { cout << "C constructor!" << endl; }
};

static C g_c; // 此处会构造一次

int main() {
  new (&g_c) C; // 又调用一次构造函数
  return 0;
}
输出(被两次调用了构造函数):
C constructor!
C constructor!
12. 函数 __attribute__
GNU C 支持 属性语法,即使用关键字 __attribute__。有几种类型的属性(后三种出现在较新版本的 GCC 中):
- 函数属性
- 变量属性
- 类型属性,用于
struct、union、enum - 标签属性、枚举属性、语句属性
本节只介绍其中的函数属性,函数的属性有两种作用:在编译时更好的检查代码、帮助编译器优化函数调用。函数的属性只能加在函数的声明上,而不能加在定义上。详细的属性列表可以参考 GCC 手册 - Common Function Attributes。
接下来会通过编译时是否定义 WITH_ATTR 来选择是否使用 __attribute__ 来比较和展示属性的实际效果。
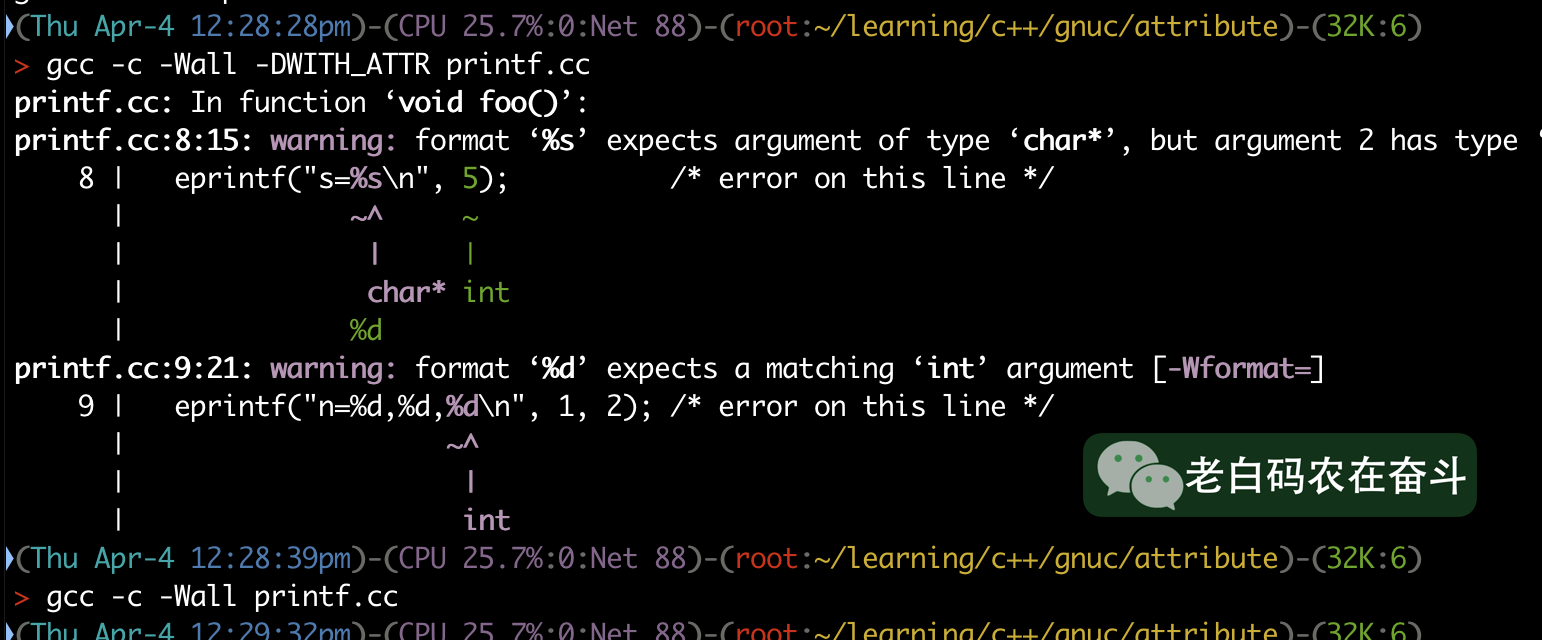
增加详细的 warning
gRPC 中有打印日志的函数有一个 __attribute__((format(printf, FORMAT_STR, ARGS))) 的属性描述。这个的主要作用是,像 printf() 函数一样,根据格式字段,检查输入的参数,上边的 FORMAT_STR 是格式的描述字段位置,ARGS 是参数开始的字段位置(位置是指字段该函数的从1开始计数第几个):
// #ifdef __GNUC__
#define GPR_PRINT_FORMAT_CHECK(FORMAT_STR, ARGS) \
  __attribute__((format(printf, FORMAT_STR, ARGS)))

GPRAPI void gpr_log(const char* file, int line, gpr_log_severity severity,
                    const char* format, ...) GPR_PRINT_FORMAT_CHECK(4, 5);
这里 gpr_log 的定义里边,属性用来检查格式,第 4 个字段作为格式,从第 5 个字段开始是否满足格式要求,如果不满足格式要求会在编译时告警。
这里使用简化的代码进行测试:
extern void eprintf(const char* format, ...)
#ifdef WITH_ATTR
    __attribute__((format(printf, 1, 2)))
#endif
    ;

void foo() {
  eprintf("s=%s\n", 5);          /* error on this line */
  eprintf("n=%d,%d,%d\n", 1, 2); /* error on this line */
}
可以看到使用格式属性的时候,会校验后续参数的格式
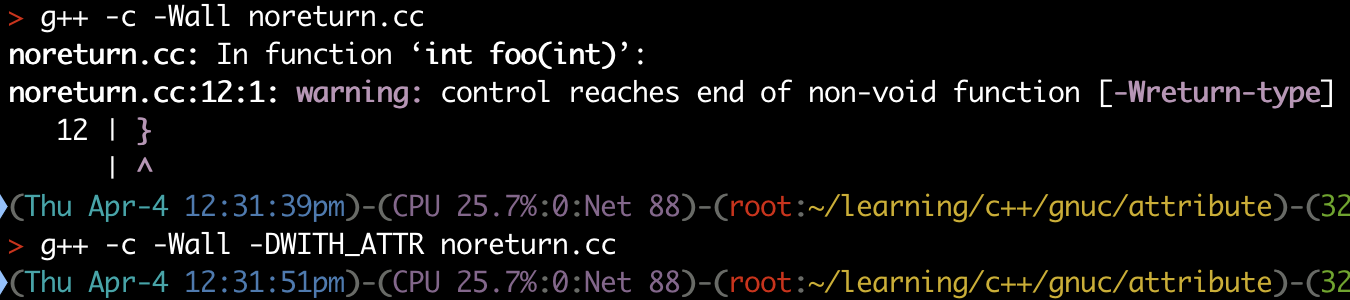
减少虚假的 warning
以 __attribute__((noreturn)) 为例,其作用是告诉编译器:这个函数中途会像 abort 或者 exit 函数一样退出,而不会返回任何值。如此一来,编译器不会再检查没有返回类型的虚假告警。
extern void exitnow()
#ifdef WITH_ATTR
    __attribute__((noreturn))
#endif
    ;

int foo(int n) {
  if (n > 0) {
    exitnow();
  } else
    return 0;
}
我们通过编译时定义 WITH_NORETURN 来使用 __attribute__((noreturn)) 可以看到原有的 warning 没有了。
辅助性能优化
作为库对外提供的时候,这些优化选项会比较重要。这里以 const 和 pure 两个属性来举例,演示函数属性可以辅助编译器更好的优化代码。
pure 表示函数的结果只依赖于输入参数和/或全局变量。对于这种类似于代数表达式的函数,如果指定了 __attribute__((pure)),编译器就会进行子表达式的消除、循环优化等优化。
int __attribute__((pure)) sum_array(int* array, int n) {
     int res = 0;
    for (int i = 0; i < n; i++) {
        res += a[i];
    }
    return res;
}
__attribute__((pure)) 能够帮助编译器忽略相同函数使用相同参数的调用,如果函数调用的返回没有使用,可以直接删掉这样的函数调用。
__attribute__((const)) 比 __attribute__((pure)) 更严格,函数只依赖于输入参数,不允许读全局变量。编译器可以在编译期间计算 const 函数的值作为常量,替换掉对该函数的调用(是真的吗?)。
另外关于 __attribute__((const)) 还有以下几点注意:
- 如果函数有指针作为参数,而会修改指针指向的数据的话,不要使用 const 属性
- 调用非 const 的函数,不要使用 const 属性
- 对返回 void 的函数没有意义
- 跟 C++ 的
const的关键字不同,C++中的含义是方法不会修改对象的状态,但是可以修改其他内存
以下边代码为例,比较一下优化效果:
#ifdef WITH_ATTR
int factorial(int n) __attribute__((const));
#endif

int factorial(int n) {  //
  return n == 1 ? 1 : n * factorial(n - 1);
}

int main() {
  int ret = 0;
  for (int i = 0; i < 100000; i++) {
    ret ^= factorial(1000);
  }
  return 0;
}
利用之前提到的空宏定义,分别编译出不使用和使用 __attribute__((const)) 的版本,可以运行时间是差异还是比较明显的:
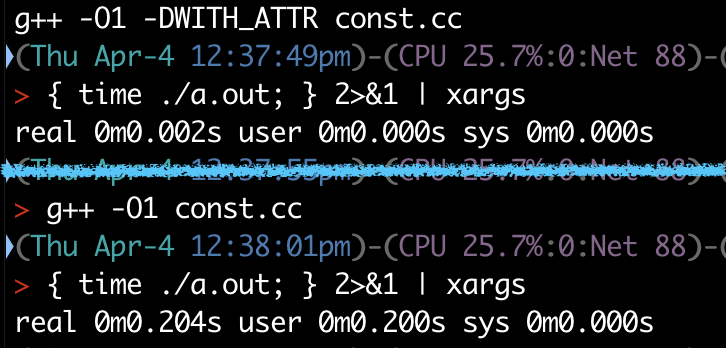
这里使用 -O1 的原因:如果使用更高级别的优化选项,运行时间的差异变得不明显,可能是编译器能够自动推断出这个函数的具有 const 的性质而自动做了优化。
13. 变参数模板
跟 C++11 之后支持的 parameter pack 还不太一样。这里的需求是:
- 要封装一个类模板,可以接受 1 到 6 个模板形参类型,长度可变
- 该类模板需要继承形参类型
- 成员函数中会依次调用形参类型的指定函数名的参数
以 CallOpSet 为例,要实现上边的需求,需要分成几部分。
创建什么也不做的类模板
这个类模板,具有正常需要使用的所有函数,但是没有任何实现,只是用来占位的。
Q: 这里为什么要使用类模板,而不是使用一个普通的类? A: 为了创建几个不同的类,这几个类拥有不同的名字,但是功能却是相同的。
Q: 为什么需要几个不同类,而不能使用一个呢? A:
template <int Unused>
class CallNoOp {
 protected:
  void AddOp(grpc_op* /*ops*/, size_t* /*nops*/) {}
  void FinishOp(bool* /*status*/) {}
  }
};
声明类模板
这里像使用函数的默认参数一样,模板的形参也是使用了默认参数,这些参数是利用类模板 CallNoOp 构造出来的没有实际动作的类。
这里的形参有 6 个,是因为 6 个是可能用到的最大个数。
template <class Op1 = CallNoOp<1>, class Op2 = CallNoOp<2>,
          class Op3 = CallNoOp<3>, class Op4 = CallNoOp<4>,
          class Op5 = CallNoOp<5>, class Op6 = CallNoOp<6>>
class CallOpSet;
定义类模板
与声明的格式保持一致,因为声明中已经加了默认类型参数,这里就不需要加了。
这里使用这些类的作用,是为了让 CallOpSet 继承不同的类,然后使用这些类的成员函数。
template <class Op1, class Op2, class Op3, class Op4, class Op5, class Op6>
class CallOpSet : public CallOpSetInterface,
                  public Op1,
                  public Op2,
                  public Op3,
                  public Op4,
                  public Op5,
                  public Op6 {...}
调用各父类的成员函数
这里使用 this->Op1::Func() 的方式可以调用到指定父类的成员函数,这跟调用静态函数不同,前边有加 this->。
  void SetHijackingState() override {
    this->Op1::SetHijackingState(&interceptor_methods_);
    this->Op2::SetHijackingState(&interceptor_methods_);
    // ...
  }
实例化变参模板类
FinishBufType 就是一个只会执行两种操作类型的类:
using FinishBufType =
            grpc::internal::CallOpSet<grpc::internal::CallOpRecvMessage<R>,
                                      grpc::internal::CallOpClientRecvStatus>;
14. 哪种模式
在 13. 变参数模板 小节中提到了,CallOpSet 通过传入不同的模版参数,将多种类型的功能捆绑在一起。实例化的模板,则具有 Op1 ~ Op6 的所有接口能力。
在 《gRPC 基础概念详解》解释生成代码的内容时,提到了另外一种方式的,通过逐级以模板参数的方式传入,形成了多级继承关系。而最终的类型具有每一级类型的接口能力。
下面来看看这两种方式有何不同,为什么采取不同的方式?这两种方式的实现,属于设计模式的哪种类型?
typedef WithAsyncMethod_GetFeature< \
    WithAsyncMethod_ListFeatures< \
    WithAsyncMethod_RecordRoute< \
    WithAsyncMethod_RouteChat<Service> > > >
    AsyncService;
调用父类的特有函数
    grpc::internal::Call call(channel->CreateCall(method, context, &cq));
    CallOpSet<CallOpSendInitialMetadata, CallOpSendMessage,
              CallOpRecvInitialMetadata, CallOpRecvMessage<OutputMessage>,
              CallOpClientSendClose, CallOpClientRecvStatus>
        ops;
    status_ = ops.SendMessagePtr(&request);
    if (!status_.ok()) {
      return;
    }
    ops.SendInitialMetadata(&context->send_initial_metadata_,
                            context->initial_metadata_flags());
    ops.RecvInitialMetadata(context);
    ops.RecvMessage(result);
    ops.AllowNoMessage();
    ops.ClientSendClose();
    ops.ClientRecvStatus(context, &status_);
14. 常见目录说明
include/grpc/impl/codegen
在使用 Bazel 规则 proto_library 产生 C++ 代码时,可以根据需要 include 指定的文件,而不是依赖整个 gRPC 库。减少依赖意味着可以减少构建时间。
只有自动生成的代码以及 gRPC 库本身会 include 这个目录中的文件,用户的代码应该从 include/grpcpp 及其子模块中引入。
而我们使用 gRPC 库的主要方式就是通过 include 自动生成的代码,所以理所当然的,我们想阅读一些代码,总会跳转到这个目录中。
比如 Call、ClientContext 、ChannelInterface、CompletionQueue 等重要类的声明和定义都是在这个目录下。
src/core/lib/surface/
grpc_init() 声明在 include/grpc/grpc.h 文件中,而其定义则是在 src/core/lib/surface/init.cc 文件中。
目录提供了 gRPC 的核心开发 API,并将【核心组件】转成【函数调用】
比如 channel.h 是中的 grpc_channel 结构和 grpc_channel_create_internal() 函数的声明,在对应的 channel.cc 中有实现。
src/core
core 提供了低层次的库,提供给高层次库封装用的。 顶层的 API 在 grpc.h 中声明 安全相关的 在 grpc_security.h 中
- include/grpc/grpc.h 是给 C 语言使用的 API
- include/grpcpp/grpcpp.h 是给 C++ 语言使用的 API
15. 继承同一基类保证初始化
随便打开 grpcpp 目录中的头文件,都能看到 gRPC 中类大都会继承自 GrpcLibraryCodegen。
类 GrpcLibraryCodegen 的在构造的时候,会判断 gRPC 是否进行了相关的初始化,如果没有都的话,会调用 g_glip->init() 进行初始化。而在其析构函数中,会调用 g_glip->shutdown() 清理相关资源。
我们知道,存在继承关系的时候,构造的顺序是:构造父类,派生类成员构造,派生类构造函数,而析构的顺序与之相反。所以,所有继承了 GrpcLibraryCodegen 的类,使用的时候都能够确保 gRPC 相关资源已经进行了初始化,而在对象被销毁时对相关资源进行清理。
初始化的函数如下:
void grpc_init(void) {
  gpr_once_init(&g_basic_init, do_basic_init);

  grpc_core::MutexLock lock(g_init_mu);
  if (++g_initializations == 1) {
该函数将初始化的内容分成了两部分:
call_once()保证只调用一次的do_basic_init()- 通过
g_initializations计数器来控制的,当g_initializations初始化次数为 0 的时候会进入分支,调用相关初始化
多线程情况下存在数据竞争,而需要保证同步。call_once() 本身能够保证同步,而第二部分是通过 Mutex Lock 来保证的。这两种方式都是使用的 abseil 库,比 std 中的有额外的一些特性。
Mutexprovides most of the functionality ofstd::mutexbut adds the following additional features:
absl::Mutexadds conditional critical sections, an alternative to condition variables.absl::Mutexintrinsically supports deadlock detection.
与 grpc_init() 对应的,是 grpc_shutdown() 函数,会当计数器到达 0 之后,清理 grpc_init() 第二部分初始化的内容:
void grpc_shutdown(void) {
  GRPC_API_TRACE("grpc_shutdown(void)", 0, ());
  grpc_core::MutexLock lock(g_init_mu);

  if (--g_initializations == 0) {
  ...
接下来看看,为什么不能都统一初始化一次或者不能都统一清理掉?换句话说,我们要弄清楚,什么资源需要只能初始化一次,什么资源需要及时清理。
只需要初始化一次
初始化一次的资源,都在 do_basic_init() 函数中。这里使用 static 的作用就是说明这个函数只在当前文件中使用,在外边通过 extern 的方式也无法获得该符号。
static void do_basic_init(void) {
  gpr_log_verbosity_init();
  g_init_mu = new grpc_core::Mutex();
  g_shutting_down_cv = new grpc_core::CondVar();
  grpc_register_built_in_plugins();
  gpr_time_init();
}
上述内容分别对应的是:
- 获取两种日志的级别,存到两个变量中
- 互斥量
g_init_mu,这是一个基本的互斥量,用于do_basic_init()第二部分中进行线程同步,也用于进程退出的同步。 - 条件变量
g_shutting_down_cv,具体使用后边有小节会介绍(TODO link)。 - 注册 gRPC 内建插件,将插件的初始化函数和销毁函数句柄设置到一个数组中。(TODO 内建插件介绍)
gpr_time_init()后边可能也会被移除,先不管
需要清理并重新初始化
- 设置
g_shutting_down和g_shutting_down_cv grpc_core::Fork::GlobalInit()和grpc_fork_handlers_auto_registergrpc_stats_init()获取核数,为每个核分配状态存储的空间grpc_core::ApplicationCallbackExecCtx::GlobalInit()
| grpc_init() | grpc_shutdown() | 作用 |
|---|---|---|
| gpr_once_init() | - | 初始化简单资源 |
| ++g_initializations | –g_initializations | 原子启动标志 |
| grpc_core::Fork::GlobalInit(); grpc_fork_handlers_auto_register(); |
grpc_core::Fork::GlobalShutdown(); | 特殊场景的Fork |
| grpc_core::ApplicationCallbackExecCtx::GlobalInit(); | grpc_core::ApplicationCallbackExecCtx::GlobalShutdown(); | 初始化执行上下文 |
| grpc_iomgr_init(); | - | IO manager 初始化 |
| gpr_timers_global_init(); | gpr_timers_global_destroy(); | |
| g_all_of_the_plugins[i].init(); | g_all_of_the_plugins[i].destroy(); | 所有插件初始化 |
| grpc_tracer_init(); | grpc_tracer_shutdown(); | |
| grpc_iomgr_start(); | grpc_iomgr_shutdown(); |
两种类型的比较
GrpcLibraryInterface 接口类
GrpcLibrary 类调用
定义在 grpc.h中
- 协助增加broker方式空活动统计和tplay日志版本统计两项任务
- 潘多拉管理端图片压缩新增两接口,支持在压缩图片文件上增加自定义头
- broker proxy 编译问题解决,国内GDP环境熟悉与部署
- OTLP collector 增加UDP连接池,解决下游转发不均问题
- HOK 世界观活动协助
grpc_init() 定义在了 lib/surface/init.cc 中
类似于线程安全的 shared_ptr,第一次调用的时候,进行初始化,其他则直接返回
void grpc_init(void) {
  gpr_once_init(&g_basic_init, do_basic_init);

  grpc_core::MutexLock lock(g_init_mu);
  if (++g_initializations == 1) {
    ...
  }
}
16. 内存屏障
随处可见的 gpr_atm_no_barrier_store 和 gpr_atm_no_barrier_load
gpr_once_init() 是只会执行一次,而下边 if 括号中的,随着 g_initializations 的增加减少可能会多次进入。
什么样的应该只执行一次,什么样的需要执行多次?
平台相关
POSIX thread 库相关变量:
typedef pthread_mutex_t gpr_mu;
typedef pthread_cond_t gpr_cv;
typedef pthread_once_t gpr_once;
The pthread_mutex_t is a POSIX solution (available for linux and other UNIX systems) that existed before c++11 introduced synchronisation primitives into the c++ library. You should use std::mutex now, amongst other things it is more cross-platform (can be used under Windows also).
应该使用 std::mutex,跨平台的
17. 另外一个条件变量的使用
在介绍 grpc_init() 的时候,有提到一个条件变量,被用于所有的 gRPC 资源被清理干净之后的退出。共有三个相关的变量被用到:
- 互斥量
g_init_mu - 条件变量
g_shutting_down_cv,使用时会利用g_init_mu - 布尔标志
g_shutting_down,只可能在 grpc_shutdown 相关函数中被置为true,在被置为false时,伴随着会调用g_shutting_down_cv->SignalAll()
g_shutting_down 置为 false
  grpc_core::MutexLock lock(g_init_mu);
  if(some_condition){ //
    g_shutting_down = false;
    g_shutting_down_cv->SignalAll();
  }
g_shutting_down 置为 true
  grpc_core::MutexLock lock(g_init_mu);
  if(some_condition){
    g_shutting_down = true;
  }
在 g_shutting_down 为真时不断等待条件变量的发生,而在 g_shutting_down为假时,退出循环。那么下边的函数的表达的功能是什么呢?就是为了在 shutdown gRPC的过程中,异步(非阻塞)的方式去等待是否有新 gRPC 相关对象被创建使用
void grpc_maybe_wait_for_async_shutdown(void) {
  gpr_once_init(&g_basic_init, do_basic_init);
  grpc_core::MutexLock lock(g_init_mu);
  while (g_shutting_down) {
    g_shutting_down_cv->Wait(g_init_mu);
  }
}
bool grpc_wait_until_shutdown(int64_t time_s) {
  gpr_timespec deadline = grpc_timeout_seconds_to_deadline(time_s);
  while (grpc_is_initialized()) {
    grpc_maybe_wait_for_async_shutdown();
    gpr_sleep_until(gpr_time_add(gpr_now(GPR_CLOCK_REALTIME),
                                 gpr_time_from_millis(1, GPR_TIMESPAN)));
    if (gpr_time_cmp(gpr_now(GPR_CLOCK_MONOTONIC), deadline) > 0) {
      return false;
    }
  }
  return true;
}
void gpr_once_init(gpr_once* once, void (*init_function)(void)) {
  static_assert(sizeof(gpr_once) == sizeof(absl::once_flag),
                "gpr_once and absl::once_flag must be the same size");
  absl::call_once(*reinterpret_cast<absl::once_flag*>(once), init_function);
}
grpc_core::MutexLock
GPR_ABSEIL_SYNC
为什么要实现自己的锁?考虑到使用着编译器的兼容性
extern GrpcLibraryInterface* g_glip;
<grpcpp/impl/grpc_library.h> 中创建并初始化 GrpcLibraryInterface 指针,全局的 g_glib,放在namespace grpc 中不回与外部的有冲突。
      GPR_CODEGEN_ASSERT(g_glip &&
                         "gRPC library not initialized. See "
                         "grpc::internal::GrpcLibraryInitializer.");
#define GPR_CODEGEN_ASSERT(x)                                              \
  do {                                                                     \
    if (GPR_UNLIKELY(!(x))) {                                              \
      grpc::g_core_codegen_interface->assert_fail(#x, __FILE__, __LINE__); \
    }                                                                      \
  } while (0)
channelz
./:void grpc_init(void) {
include/grpc/impl/codegen/grpc_types.h 中并没有 include 有 grpc_completion_queue 声明的文件,为什么可以调用。不需要知道类型?
typedef struct grpc_completion_queue grpc_completion_queue;
  std::shared_ptr<Channel> CreateChannelWithInterceptors(
      const std::string& target, const ChannelArguments& args,
      std::vector<std::unique_ptr<
          grpc::experimental::ClientInterceptorFactoryInterface>>
          interceptor_creators) override {
    grpc_channel_args channel_args;
    args.SetChannelArgs(&channel_args);
    grpc_channel_credentials* creds = grpc_insecure_credentials_create();
    std::shared_ptr<Channel> channel = grpc::CreateChannelInternal(
        "", grpc_channel_create(target.c_str(), creds, &channel_args),
        std::move(interceptor_creators));
    grpc_channel_credentials_release(creds);
    return channel;
  }
grpc_channel_credentials* grpc_insecure_credentials_create() {
  // Create a singleton object for InsecureCredentials so that channels to the
  // same target with InsecureCredentials can reuse the subchannels.
  static auto* creds = new grpc_core::InsecureCredentials();
  return creds->Ref().release();
}
声明在:
include/grpc/grpc.h
GRPCAPI grpc_channel* grpc_channel_create(const char* target,
                                          grpc_channel_credentials* creds,
                                          const grpc_channel_args* args);
定义在:
src/core/ext/transport/chttp2/client/chttp2_connector.cc
grpc_channel* grpc_channel_create(const char* target,
                                  grpc_channel_credentials* creds,
                                  const grpc_channel_args* args) {
调用了:src/core/lib/surface/channel.h(.cc)
/// Creates a grpc_channel.
grpc_channel* grpc_channel_create_internal(
    const char* target, const grpc_channel_args* args,
    grpc_channel_stack_type channel_stack_type,
    grpc_transport* optional_transport, grpc_error_handle* error);

grpc_channel* grpc_channel_create_with_builder(
    grpc_core::ChannelStackBuilder* builder,
    grpc_channel_stack_type channel_stack_type,
    grpc_error_handle* error = nullptr);
创建的在相同文件中定义的结构:
struct grpc_channel {
  int is_client;
  grpc_compression_options compression_options;

  gpr_atm call_size_estimate;
  grpc_core::ManualConstructor<grpc_core::CallRegistrationTable>
      registration_table;
  grpc_core::RefCountedPtr<grpc_core::channelz::ChannelNode> channelz_node;
  grpc_core::ManualConstructor<grpc_core::MemoryAllocator> allocator;

  grpc_core::ManualConstructor<std::string> target;
};
使用了结构 class ChannelNode : public BaseNode {..
基类用自己实例化的模板类
gRPC Core 是用 C++ 写的
区分依据,是否有
#ifdef __cplusplus
extern "C" {
#endif
real	0m5.651s
user	0m0.048s
sys	0m1.592s


real	0m1.666s
user	0m0.096s
sys	0m1.556s
术语
work
grpc_combiner:A combiner represents a list of work to be executed later.
exec_ctx(Execution context):记录调用栈(callstack)信息的数据,存储于线程变量中。
iomgr:
rpc_method(RpcMethod):描述RPC方法的类
Call:同步和异步都能使用的调用类,封装了调用相关的一些状态和变量,比如 call_hook_
CallHook:
ops CallOpSet:一次调用,依次要做的恶操作。
ClientContext ServerContext CallbackServerContext
CompletionQueue:Client侧的 ServerCompletionQueue:Server侧的
为什么同步调用的时候,也需要 CompletionQueue?
需要理解CompletionQueue到底是干嘛的!!!
异步调用时,需要自己创建 CompletionQueue,并且重复使用.
关系

Channel -|> CallHook
BlockingUnaryCallImpl
CallOp:
CallOpSendInitialMetadata CallOpSendMessage CallOpRecvMessage CallOpGenericRecvMessage CallOpClientSendClose CallOpServerSendStatus CallOpRecvInitialMetadata CallOpClientRecvStatus
BlockingUnaryCallImpl
CallOpSet
- 创建 Call 和 CallOpSet
- 依次调用 ops 的函数,即网络处理逻辑
- SendMessagePtr 将输入(通常为Protobuf消息)进行序列化,并储存在 ops 成员中
- SendInitialMetadata 将发送元数据指针保存在 ops 成员中
- RecvInitialMetadata 将返回元数据的指针保存在 ops 成员中
- RecvMessage 将接收的消息地址保存在 ops 成员中
- AllowNoMessage
- ClientSendClose
- ClientRecvStatus